Introducing the DHCSS Stakeholder Map workflow (part 3)
File encryption, and automation with GitHub Actions
This is the fourth blog in a series about how to set up a data pipeline using R, GitHub Actions, Kumu, and Shiny that was developed for the SADiLaR Stakeholder Map project. The first blog described the launch of the Stakeholder Map project, and the second blog provided an introduction to the data pipeline and the software used. The third blog looked at how to set up the authorisations needed to read data from Google Sheets. Here, we describe how to encrypt the .json file and automate the whole process using a GitHub Action.
A recording where the data pipeline is explained is available at https://youtu.be/dAx6CWbraA4 . The slides can be accessed using this link: https://doi.org/10.5281/zenodo.6473091.
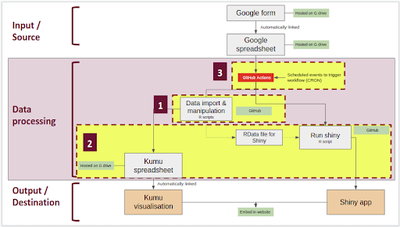
As described in the previous blog, the data pipeline is divided into three stages: input, processing, and output (Fig 1). The processing stage can be divided into three steps: 1) data import and manipulation, including the authorisations needed to read from and write to Google Sheets, 2) the data output files used to run the visualisations, and 3) GitHub Actions that are used to automate the process. The first two steps were discussed in the previous blog. Here, we move onto the third step.
1) Automation using GitHub Actions
“GitHub Actions is a continuous integration and continuous delivery (CI/CD) platform that allows you to automate your build, test, and deployment pipeline” (source).
GitHub’s documentation is a good place to start to help with understanding GitHub Actions. Follow the steps given in GitHub’s documentation to create an example workflow in order to better understand how GitHub Actions work (also, see the references below).
The tricky questions to answer for the Stakeholder Map data pipeline at this point were:
- where to store the .json file and how to keep it secret
- how to set up the authorisations to read from and write to Google Sheets using
googlesheets4within a GitHub Action
Getting the GitHub Action to work with the correct authorisations was tricky, and after many days of trial and error, advice was sought by posting to the googlesheets4 GitHub (see here), as well as to the R for Data Science (R4DS) Slack channel. From the R4DS Slack channel, Jonathan Tratner suggested his package, tokencodr.
The tokencodr package
For useful information about how to use this package, see:
- https://github.com/jdtrat/tokencodr
- https://tokencodr.jdtrat.com/articles/tokencodr.html
- https://github.com/jdtrat/tokencodr-google-demo
Based on the gargle vignette for managing tokens securely, the package tokencodr similarly encrypts files with the sodium package but allows you to specify the location of where the encrypted file (here the .json) should go, which makes it useful for non-package environments. This is great, because much of the information available on encryption is for package environments. The encrypted file is ok to commit to GitHub as long as the password is kept out of it.
a) Install the tokencodr package
# Install the development version from GitHub
if (!require("remotes")) install.packages("remotes")
remotes::install_github("jdtrat/tokencodr")

# Load package
library(tokencodr)
You may run into problems if your renv is activated, e.g:
Error in file(filename, "r", encoding = encoding) : cannot open the connection In addition: Warning message: In file(filename, "r", encoding = encoding) : cannot open file 'renv/activate.R': No such file or directory
To fix this, open a new project, run renv::deactivate(), and the install should then work. See a post on this here (Error: package ‘GenomeInfoDb’ could not be loaded - General - RStudio Community).
b) Steps to follow for encryption using tokencodr
When encrypting a file, call tokencodr::create_env_pw()
For example:
create_env_pw("MY_GOOGLE")
The output is as follows (note that ‘[generated password]’ has been inserted here in place of the actual password given):
- You may wish to add to your .Renviron file:
MY_GOOGLE_PASSWORD=[generated password]
[Copied to clipboard]
- To edit your .Renviron file:
  - Check that usethis is installed.
  - Call `usethis::edit_r_environ()`.
  - Check that .Renviron ends with a new line.
To make this work locally, run the following command to open .Renviron:
usethis::edit_r_environ()
You will see this output in the console:
- Modify '/Users/user/.Renviron'
- Restart R for changes to take effect
.Renviron opens. Paste MY_GOOGLE_PASSWORD=[generated password] into the first line, press enter to insert a new line. Save and close.
Then, to encrypt the .json file and put it in a secret directory (you specify the location):
encrypt_token(service = "MY_GOOGLE",
 input = "[filename].json",
 destination = "~/[path to where you want the file]/")
Then, for using locally, in your R script, set the authorisations using the googlesheets4 package:
gs4_auth(email = "[your email address]",
 path = "~/[path to the file]/.secret/MY_GOOGLE")
This is great to get everything to work locally, but now to get this to work in a GitHub Action.
c) Using tokencodr in a GitHub Action
See the Stakeholder Map GitHub repository for all files and folders.
i. Set up the R project and GitHub repo
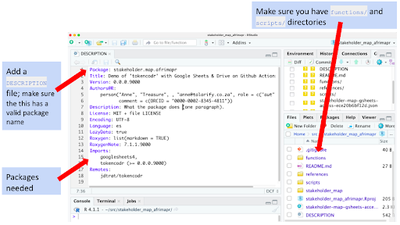
Create an RStudio Project with functions/ and scripts/ directories, a README file, and DESCRIPTION file (similar format to an R Package) (Fig 2). Make sure the DESCRIPTION file has a valid package name.
ii. Create a GitHub repository secret
Once you have your GitHub repo set up and linked with your R project, the encrypted .json file will be in a .secret folder in the GitHub repo if you followed the encryption steps above in (b). Then, you need to put the password for the encrypted file into a GitHub Action secret:
- Go to the Settings for your GitHub repo
- Select Secrets from the menu on the left hand side
- Create a new repository
secret(Fig 3)- When encrypting the .json file using
create_env_pw(), if you pass in the name “MY_GOOGLE” for examplecreate_env_pw("MY_GOOGLE"), the name you give to your GitHub Action secret is MY_GOOGLE_PASSWORD, and the Value is the [generated password] fromcreate_env_pwexplained above (the value must be just the actual password sequence of letters and numbers; do not include ‘MY_GOOGLE_PASSWORD=’)
- When encrypting the .json file using

iii. Edit the R scripts
- Add function for authorisation using
tokencodr - Edit data import / manipulation scripts
For updating the Stakeholder Map Kumu visualisation, an R script reads in data from the Google Sheet (which is linked to the Google Form), does some data manipulation steps, then writes this new data set to a separate Google Sheet, which is linked to Kumu. This is the script which is automated by the GitHub Action and is in the scripts/ directory. The top of this script calls the authorisation functions for googlesheets4, wrapped in a function recommended on the tokencodr demo, in the functions/ directory (called ‘[func_auth_google.R](https://github.com/DHCSSza/stakeholder_map/blob/main/functions/func_auth_google.R’ - you can copy this file) to make it easier for using tokencodr: The function just needs to be edited as necessary, for example adding your email address:
auth_google <- function(email, service, token_path) {
    googlesheets4::gs4_auth(
        email = "[your email address]",
        path = tokencodr::decrypt_token(
               service = service,
               path = token_path,
               complete = TRUE
        )
    )
}
Then, add to your R script:
source("functions/func_auth_google.R")
# Authenticate Google Service Account
auth_google(email = "[your email address]",
            service = "MY_GOOGLE",
            token_path = ".secret/MY_GOOGLE")
iv. Create the .yml file for the GitHub Action
Please read the references given below for understanding GitHub Actions and the .yml file (e.g. https://docs.github.com/en/actions/learn-github-actions/understanding-github-actions).
See the Stakeholder Map Kumu .yml file here.
The GitHub Action workflow is defined by the YAML file (.yml) and is triggered by an event in your repository, manually, or at a defined schedule.
- Events to trigger the workflow
- GitHub documentation on this can be found here
- The Stakeholder Map GitHub Actions use a scheduled event - you can schedule a workflow to run at specific UTC times using POSIX cron syntax. You set this in the GitHub Action .yml file
In the GitHub Action .yml file, for your secrets, you would pass in the environmental variable as follows: env:
GITHUB_PAT: ${{ secrets.GITHUB_TOKEN }}
MY_GOOGLE_PASSWORD: ${{ secrets.MY_GOOGLE_PASSWORD }}
Note that the syntax and formatting of your .yml is important (e.g. where the spaces and dashes are), you must have a trigger, set your environmental variables (where you tell it what secrets to look for), choose a runner (the server the GitHub Action will run on), and, lay out your sequence of steps (each step must have a uses or run). The Stakeholder Map update_kumu.yml defines a workflow that runs R scripts (see .yml file here). There are two R scripts that import and manipulate data, and two GitHub Actions:
- The first R script imports and manipulates data for the Kumu visualisation. This data is written to a separate Google Sheet, which is linked to Kumu
- The second R script imports and manipulates data for the Shiny app. This data is saved to an RData file
- The first GitHub Action runs both of the R scripts, therefore updating the Google Sheet data for Kumu, and saving (and committing to GitHub) the updated RData file for Shiny
- The second GitHub Action connects to shinyapps.io and deploys the updated Shiny app (the subject of the next blog)
The two GitHub Actions are triggered using scheduled events, and are timed to run 30 minutes apart to ensure that the updated data will be used for deploying the Shiny app.
Troubleshooting
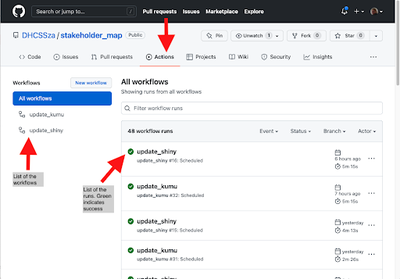
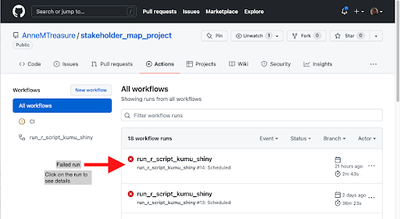
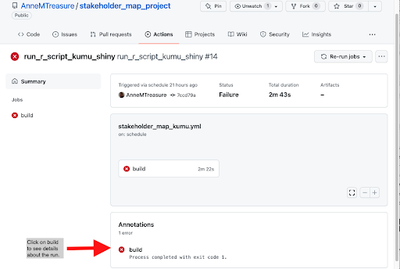
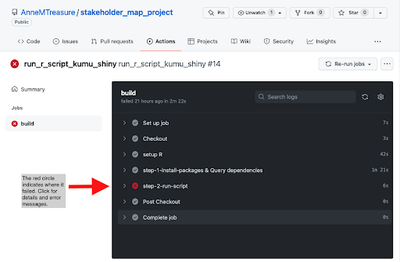
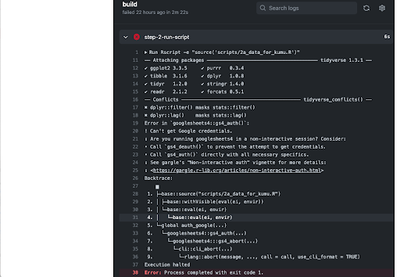
It may take a few trials to get the GitHub Action to run and to figure out what elements are needed in the .yml file. See the reference section below for useful links and extra information. If your GitHub Action run does not work and gives errors, you can see these by navigating to Actions, click on the workflow you want, and you will see a list of the runs (Fig 4). If you click on a failed one (Fig 5), you can investigate where the run broke by clicking on the builds under Annotations (Fig 6) to bring up a summary of the run (Fig 7). Clicking on a step will give information on that step, as well as error messages for failed steps. For example, if you get a permission denied error (Fig 8), check all your authorisation steps, and make sure you have shared your Google Sheet with the service account email.
Another benefit of the run summary is the breakdown of times given for each step of the GitHub Action to run. For steps that are very slow, you can then focus on ways to optimise these steps.
Where to next
The next and final blog in this series will look at how to deploy a Shiny app from GitHub, and how to automate this with a GitHub Action.
References
Below are useful links.
Service account tokens, non-interactive, workflows for this
- https://github.com/tidyverse/googledrive/issues/327 - used this for workflow
- https://github.com/tidyverse/googlesheets4/issues/170
- https://github.com/marketplace/actions/google-sheets-secrets-action - useful bit on workflow for service account, token, etc
- Creating a data pipeline with Github Actions & the {googledrive} package for the Canadian Premier League soccer data initiative! - setting up GCP service account, etc
Non-interactive authorisations
- https://github.com/tidyverse/googledrive/issues/239
- https://cran.r-project.org/web/packages/gargle/vignettes/non-interactive-auth.html - often recommended, especially by Jenny Bryan
- https://gargle.r-lib.org/articles/non-interactive-auth.html
GitHub Actions
- Read this to understand GitHub Actions: https://docs.github.com/en/actions/learn-github-actions/understanding-github-actions
- Example for Continuous Integration with GitHub Actions
GitHub Actions Yaml’s
- Running R Scripts on a Schedule with GitHub Actions - really good blog post, very useful for understanding GitHub Actions and YAMLs, for a package environment though
- https://github.com/simonpcouch/scheduled-commit-action/blob/master/.github/workflows/schedule-commit.yaml
- Running an R Script on a Schedule: Gh-Actions - some useful info here
- Creating a data pipeline with Github Actions & the {googledrive} package for the Canadian Premier League soccer data initiative! - useful for GitHub Action workflow
- https://www.rforseo.com/ressources/launch-an-r-script-using-github-actions - simple e.g. of R script and .yml
- Automatic Rendering of a Plot with GitHub Actions - some useful info on setting up the .yml
- GitHub Action with R book - good, got some pointers from here about how to set up GitHub Action for R, whats going on in the .yml file
- Look at the r-lib example YAMLs, e.g.: https://github.com/r-lib/actions/blob/master/.github/workflows/check-standard.yaml
gargle documentation
- Managing tokens securely - recommended by Jenny Bryan, applies to packages, but tokencodr works largely on the same principles for a non-package environment
- https://gargle.r-lib.org/articles/get-api-credentials.html#service-account-token-1
Secrets
- Managing Secrets vignette by Hadley Wickam
- Packages to deal with secrets
GitHub Actions and Shiny
- https://towardsdatascience.com/automating-a-covid19-report-update-and-publishing-with-github-actions-a3d64315e515#1dc4
- https://github.com/lucharo/COVID19/blob/master/.github/workflows/automate.yml
- https://stackoverflow.com/questions/67040654/r-shinyapps-deployment-error-when-doing-it-manually
- https://github.com/MattCowgill/djprlabourdash/blob/main/.github/workflows/deploy-shiny.yaml
- https://mirai-solutions.ch/techguides/cicd-pipelines-for-automatic-deployment-of-a-r-shiny-web-app.html
- https://mirai-solutions.ch/techguides/github-actions.html