Introducing the DHCSS Stakeholder Map workflow (part 2)
Setting up the authorisations needed to read from Google Sheets
This is the third blog in a series about how to set up a data pipeline using R, GitHub Actions, Kumu, and Shiny that was developed for the SADiLaR Stakeholder Map project. Our first blog described the launch of the Stakeholder Map project, and the second blog provided an introduction to the data pipeline and the software used. Here, we look at how to set up the authorisations needed to read data from Google Sheets. To view a recording where the data pipeline is explained, please see a presentation using this link: https://youtu.be/dAx6CWbraA4 and the slides using this link: https://doi.org/10.5281/zenodo.6473091.
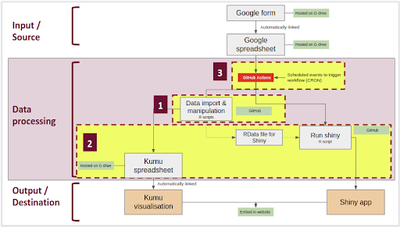
The data pipeline (Fig 1) is divided into three stages, namely the input or source, data processing, and the output or destination. In our pipeline, the input consists of data sourced from a Google Sheet linked to a Google Form. The output is the data visualisations in Shiny and Kumu. For the purposes of the next three blogs, the data processing stage will be explained in three steps: 1) data import and manipulation, including the authorisations needed to read from and write to Google Sheets, 2) the data output files (a Google Sheet and a RData file) used to run the visualisations, and 3) GitHub Actions that are used to automate the process.
1) Data import and manipulation, and authorisations
The first step for the data processing is to read data from the Google Sheet. In R, there is a package called googlesheets4, which can be used to read from and write to Google Sheets. Authorisations need to be set up to enable this interaction, for which R scripts can run locally but need interaction (watch the recording given above for more information). However, if you want your script to run non-interactively, i.e. without any manual authorisations needed to enable access to the Google Sheets, you can set this up following the process below (Jenny Bryan gives useful pointers in this issue about using a service account for non-interactive authorisations):
- Create a Google Cloud Platform account
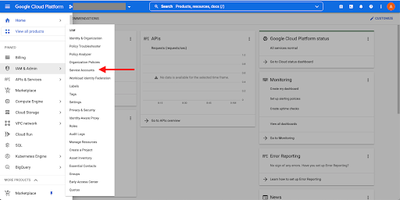
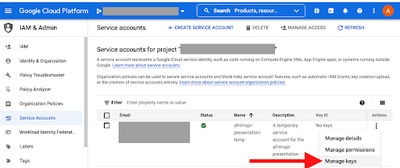
- Create a service account
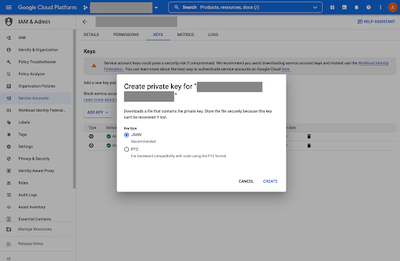
- Create a service account key and download the .json file
- Make the service account email address an editor to your google sheet
- Point
gs4_auth()to the .json from step 3
This was first setup to work locally; then it was adapted for GitHub Actions.
Resources and pointers for each step
- Create a Google Cloud Platform account
- Create a service account (Figs 2 & 3)
- For creating a service account, there are useful tips on these web pages:

- Create a service account key (Fig 4) and download the .json file (Fig 5)
- See here for more info on service account keys
- .json file: For working on the R project locally, the downloaded .json file was moved into the R project folder. For the GitHub Actions though, this file needs to be encrypted / hidden. Find more information on this below.
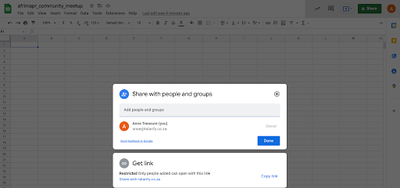
- Make the service account email address an editor to your Google Sheet (Fig 6)
- Open the .json file and copy the email address of the service account (this can also be found on your Google Cloud Platform service accounts web page)
- In the sharing settings of the Google Sheet (for us, the one linked to the Google Form), add this email address and give it editing access. This enables the authorisations needed to access the Google Sheet using your service account.
- Point
gs4_auth()to the .json file
gs4_auth()is the function ingooglesheets4that sets the authorisations- In your R script, you need to point
gs4_auth()to the .json file, giving the path to where the file is located - e.g. direct path to the .json file in the r project directory:
gs4_auth(email = "[my email address]",path = "~/[path to file]/[filename].json")
2) The data output files
After setting up the authorisations and importing data from the Google Sheet, the R scripts (which can be found in our GitHub repository) manipulate the data into formats needed for the data visualisations. First, a script writes data to a Google Sheet in a format ready for Kumu. This spreadsheet is linked to Kumu and therefore updates the visualisation automatically. A second script saves dataframes for Shiny to a RData file. Another R script then creates and runs the Shiny app.
Where to next
The way in which the authorisations were set up above is all very well for running your script locally within your R project. However, for the purposes of this project, a workflow that would enable everything to run in an automated way, and without any interaction was needed - GitHub Actions is a way to do this. The main challenge for this though was figuring out how to make the .json file a secret. The .json file contains information to access accounts and should not be made public. Therefore, it is very important to encrypt this file and to make the password to access (decrypt) the file a secret. See the next blog in our series for how this was done, using the tokencoder package and GitHub Actions. The GitHub Actions automate the whole workflow without any interaction, from the input (Google Sheet linked to a Google Form) to the output (Kumu and Shiny).
References
Below are useful links.
Service account tokens, non-interactive, workflows for this
- https://github.com/tidyverse/googledrive/issues/327 - used this for workflow
- https://github.com/tidyverse/googlesheets4/issues/170
- https://github.com/marketplace/actions/google-sheets-secrets-action - useful bit on workflow for service account, token, etc
- Creating a data pipeline with Github Actions & the
{googledrive}package for the Canadian Premier League soccer data initiative! - setting up GCP service account, etc
Non-interactive authorisations
- https://github.com/tidyverse/googledrive/issues/239
- https://cran.r-project.org/web/packages/gargle/vignettes/non-interactive-auth.html - often recommended, especially by Jenny Bryan
- https://gargle.r-lib.org/articles/non-interactive-auth.html
GitHub Actions
- Read this to understand GitHub Actions: https://docs.github.com/en/actions/learn-github-actions/understanding-github-actions
- Example for Continuous Integration with GitHub Actions
GitHub Actions Yaml’s
- Running R Scripts on a Schedule with GitHub Actions - really good blog post, very useful for understanding GitHub Actions and YAMLs, for a package environment though
- https://github.com/simonpcouch/scheduled-commit-action/blob/master/.github/workflows/schedule-commit.yaml
- Running an R Script on a Schedule: Gh-Actions - some useful info here
- Creating a data pipeline with Github Actions & the
{googledrive}package for the Canadian Premier League soccer data initiative! - useful for GitHub Action workflow - https://www.rforseo.com/ressources/launch-an-r-script-using-github-actions - simple e.g. of R script and .yml
- Automatic Rendering of a Plot with GitHub Actions - some useful info on setting up the .yml
- GitHub Action with R book - good, got some pointers from here about how to set up GitHub Action for R, whats going on in the .yml file
- Look at the r-lib example YAMLs, e.g.: https://github.com/r-lib/actions/blob/master/.github/workflows/check-standard.yaml
gargle documentation
- Managing tokens securely - recommended by Jenny Bryan, applies to packages, but tokencodr works largely on the same principles for a non-package environment
- https://gargle.r-lib.org/articles/get-api-credentials.html#service-account-token-1
Secrets
- Managing Secrets vignette by Hadley Wickam
- Packages to deal with secrets:
GitHub Actions and Shiny
- https://towardsdatascience.com/automating-a-covid19-report-update-and-publishing-with-github-actions-a3d64315e515#1dc4
- https://github.com/lucharo/COVID19/blob/master/.github/workflows/automate.yml
- https://stackoverflow.com/questions/67040654/r-shinyapps-deployment-error-when-doing-it-manually
- https://github.com/MattCowgill/djprlabourdash/blob/main/.github/workflows/deploy-shiny.yaml
- https://mirai-solutions.ch/techguides/cicd-pipelines-for-automatic-deployment-of-a-r-shiny-web-app.html
- https://mirai-solutions.ch/techguides/github-actions.html